I’ve made a couple tote bags before. They’re easy to make (with very few 3D parts) and surprisingly useful these days when the bulk of your outside trips that require a bag are only to the grocery store.
I’d spied some neat reflective fabric last time I was shopping on extremtextil (my current go to place for outdoor technical fabrics) and was looking for a project to use it on. In the end I didn’t order from them but found some similarly awesome materials from Hello Reflectives in the UK.
It’s dark this time of year in Northern Europe, so something that is super reflective, ideally in an overwhelming and cool way is a plus. The flash bomber hoody/jacket that Betabrand in the US used to make was always awesome, but hard to justify purchasing, especially now as they seem to have pivoted away from cordarounds and disco tuxes to a women’s comfort wear company.
Anyway, I ended up settling on a tote bag, and this is how it went.
Materials

- Reflective fabric (for the main bag material). I went for this exact one. 100cm x 48cm
- Materials for bag handle. You could in theory also use the reflective fabric, but I went for some grey 70den PU coated nylon that I had around from another project. ~66cm x 7cm x 2
- Bias binding for inside edge of bag. It’s not strictly necessary, but I didn’t know how the edges would fare and plus it looks nice. 50cm x 2.5cm x 2
- [Optional] Material to make inner pocket. I didn’t go for this, but it would be super easy to add a flat pocket (or two) to the inside.
- [Optional] Lining, if you wanted to make a lined tote bag. Again, I didn’t opt for this, but its up to you.
Method
- If you want to do pockets and lining, do them now as it’s going to be a lot harder one you have gone any further.
- Fold the main piece of fabric for the bag in half along the shorter axis (so that it’s ~50cm x 48cm now). Pin the bias binding along the seams on either side and sew down each side.
- Create the base of the bag. Flatten the seam that you’ve just sewn and about 6cm from the bottom corner you want to sew a 12cm line perpendicular to the first seam, basically creating an isosceles triangle. Repeat this in the other bottom corner of the bag. You can now turn it inside out and check that you have a base. It should be around 12cm x ~34cm if you’ve gone with a 12cm line in the same place I did. If you want a smaller/bigger base, then feel free to adjust as necessary.
- Make the handles. Fold in half across the long axis and sew down the long edge on each handle. Turn inside out (I used a chopstick for this) and give them a cursory iron to make them easier to deal with.
- Sew the hem at the top of the bag. I started with the bag inside out here, folded once (at ~1.5cm) and stitched around the top. I then turned the bag the right way out, positioned the handles (symmetrically) and make a second hem with the handles as part of it (they were pointing down inside the bag at this point). Once that was done, I pulled the handles out and added further stitching (on the same line) just around the handles to add extra strength.

Thoughts and Next steps
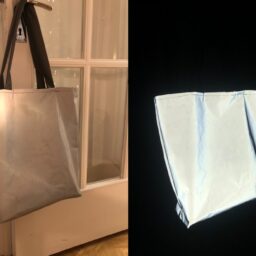
It looks great. I’ve only used it a handful of times, but it’s super bright, reflects well and also functions as a bag. I’m not too sure how durable and strong the fabric is (I don’t want to risk it just yet), but I can see some markings on the reflective side from construction and the bag rubbing on things. Hopefully it won’t fade too much, but maybe a weathered look will be cool. Time will tell.
I still have a fairly large section of the reflective fabric left, so I’ll find something else to make bright for the winter. Perhaps a small backpack to test some more of my skills (and patience).